Paulina
New member
Do you deploy software to your customers, need to train them, quickly solve their issues, or provide technical support? Try the ultra-secure remote desktop tool designed to support your customers – Remotly QuickSupport. QuickSupport guarantees your customers the highest level of cybersecurity and top-quality connections to you, regardless of network conditions, firewalls, or the quality of your customers' hardware. To test the tool for free, contact the Remotly team at: https://remotly.com/contact.
Key features of Remotly QuickSupport:
Please find below a step-by-step guide on how to start using Remotly QuickSupport:
1. Contact the Remotly team to get a commercial trial license (https://remotly.com/contact).
2. Edit the interface and download your branded QuickSupport from your commercial admin panel - https://remotly.com/login:

3. Rename the RemotlyQS.exe to the name that is provided in your admin panel. The name is assigned to a specific company. Make sure that when downloading the installation file from the admin panel, you rename it correctly. RemotlyQS will not be installed unless the correct organization code is included in the exe name. Check for any typos in the installation file name, and ensure that the .exe extension is not duplicated, as some computers may not display file extensions.
4. Share the RemotlyQS_.exe file with your end users (the people you will be connecting to). You can share the installation file on your website, for example, or integrate it directly into your software as a Helpdesk tool. After downloading the installation file, end users should install the software, but they do not need to register and log in.
5. This is how the application looks after starting it on the end user's PC.

The end user can, among other things, change the language of the application, share a selected monitor or all monitors, and allow or block clipboard sharing. Any connection made to the end user must be authorized by them. The connection can also be terminated by them at any time. During the connection, a yellow frame will appear around the remotely streamed decktop.
6. Get the connection code from the end user and use it to connect from your regular version of Remotly (downloaded from: https://remotly.com/download).
7. If you plan to regularly support a particular user, you can add their connection code as a new device in the user panel and create a name (alias) for it. In the admin panel, you can also create groups, assign devices to them, and share them with authorized people in your organization.

From the admin panel, you can also manage administrator privileges, grant licenses to users in your company, and let your selected users see access to end-users (under the 'Admin Mode' tab) using the hide/show eye icon.

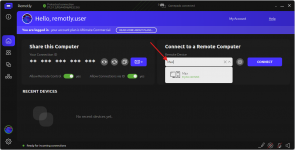
8. To easily select the device you want to connect to, use the filter option in the Remotly main interface, or find the device in the grouped devices in the Devices tab, also in the Remotly main interface:


9. During connections to QuickSupport you can quickly copy and paste files, record the stream, use voice chat, draw on the screen, as well as install your own relay server and make connections based only on your IT infrastructure. You can find more information about your own relay server and instructions for installing it on the community page: https://community.remotly.com/threads/setting-up-your-own-cloud-instance-relay-server.54/
Got a question? Ask our support team on community forum below.
Want to test a commercial license? Contact us at: https://remotly.com/contact.
Key features of Remotly QuickSupport:
- Remotly QuickSupport does not require end users/your customers to log in to a Remotly account – all they need to do is download and install the application you provide (e.g., from your website or directly from your software.
- Remotly QuickSupport uses strong 14-character connection codes along with RSA 4096 and AES 256 (end-to-end) encryption to enable an ultra-secure connection to the computers running the QuickSupport instance (RemotlyQS_.exe).
- Remotly QuickSupport can be branded with your company's logo. You can customize the application's colors and subtitles.
- Connections to computers running QuickSupport are only possible for licensed users from a given organization - connections from users outside that organization are blocked, which gives your customers an additional layer of security.
- The names of the devices you connect to can be easily edited and grouped. You can allow or remove access to them for selected technical support users from your company via the admin panel (hide/show the 'eye' icon next to the user who has a license in your company).
- Remotly QuickSupport allows you to add your own connection relay server, providing an extra layer of security and ensuring compliance with GDPR regulations.
- Remotly QuickSupport protects the end user from full control of their computer – any operations requiring admin rights are unavailable (if you need a tool to fully manage and administer a remote computer, check out Remotly QuickHost - https://community.remotly.com/threa...sktop-solution-for-system-administrators.205/)
- Remotly QuickSupport works even on older Windows 7 computers.
Please find below a step-by-step guide on how to start using Remotly QuickSupport:
1. Contact the Remotly team to get a commercial trial license (https://remotly.com/contact).
2. Edit the interface and download your branded QuickSupport from your commercial admin panel - https://remotly.com/login:
3. Rename the RemotlyQS.exe to the name that is provided in your admin panel. The name is assigned to a specific company. Make sure that when downloading the installation file from the admin panel, you rename it correctly. RemotlyQS will not be installed unless the correct organization code is included in the exe name. Check for any typos in the installation file name, and ensure that the .exe extension is not duplicated, as some computers may not display file extensions.
4. Share the RemotlyQS_.exe file with your end users (the people you will be connecting to). You can share the installation file on your website, for example, or integrate it directly into your software as a Helpdesk tool. After downloading the installation file, end users should install the software, but they do not need to register and log in.
5. This is how the application looks after starting it on the end user's PC.
The end user can, among other things, change the language of the application, share a selected monitor or all monitors, and allow or block clipboard sharing. Any connection made to the end user must be authorized by them. The connection can also be terminated by them at any time. During the connection, a yellow frame will appear around the remotely streamed decktop.
6. Get the connection code from the end user and use it to connect from your regular version of Remotly (downloaded from: https://remotly.com/download).
7. If you plan to regularly support a particular user, you can add their connection code as a new device in the user panel and create a name (alias) for it. In the admin panel, you can also create groups, assign devices to them, and share them with authorized people in your organization.
From the admin panel, you can also manage administrator privileges, grant licenses to users in your company, and let your selected users see access to end-users (under the 'Admin Mode' tab) using the hide/show eye icon.
8. To easily select the device you want to connect to, use the filter option in the Remotly main interface, or find the device in the grouped devices in the Devices tab, also in the Remotly main interface:
9. During connections to QuickSupport you can quickly copy and paste files, record the stream, use voice chat, draw on the screen, as well as install your own relay server and make connections based only on your IT infrastructure. You can find more information about your own relay server and instructions for installing it on the community page: https://community.remotly.com/threads/setting-up-your-own-cloud-instance-relay-server.54/
Got a question? Ask our support team on community forum below.
Want to test a commercial license? Contact us at: https://remotly.com/contact.
Attachments
Last edited: