Hi Everyone,
In this tutorial we explain how to set up the IP address, port and other settings of you own data transfer server.
It is important not to open your main PC to any potential external attacks. Port forwarding is a nice feature but it is also a security threat. Furthermore if you leave your computer on all the time it consumes much more power than a simple Linux server based on a low-power device like Raspberry Pi or similar device.
Below are some of the main benefits of setting up a private connection server either at home or in your company:
- Lowest possible network lag
- No need to port forward data to any of your PCs that you want to access remotely
- Less power consumption
- Wake-On-Lan accessible from WAN (outside your local network)
- Attacks can only be done on the Linux server. But this does nothing for the attacker as all the data passing the server is encrypted with a key that is not accessible by this server
- Share your server with your friends/co-workers (limit costs)
- No problems with GDPR (passing sensitive data via third party servers)
This guide assumes you have already set up the remote computer (Linux server, Raspberry Pi etc.) you want to make your relay server and have all necessary permissions.
1. First, we need to access the remote machine's Linux system using SSH client. To establish SSH connection, client will ask to provide host IP address and user credentials. There are various tools you can use at this point, e.g. WinSCP, FileZilla or build-in openssh. From now on all the subsequent steps will refer to the server operating system.
2. In order to download Remotly relay you can use WGET utility typing the following command:
For AMD64 architecture please use:
wget https://downloads.mirillis.com/files/remotly-relay-linux-amd64-v2.zip
For ARM64 architecture please use:
wget https://downloads.mirillis.com/files/remotly-relay-linux-arm64-v2.zip
For ARM7 32-bit architecture please use:
wget https://downloads.mirillis.com/files/remotly-relay-linux-arm7-v2.zip
3. After that, unzip the remotly.zip file
unzip remotly-relay.zip
If you don't have unzip installed you probably run into "unzip: command not found" error. In that case you can install it by running the following commands:
sudo apt-get update
sudo apt-get install unzip
4. Grant proper credentials:
sudo chmod 755 -R remotly
sudo chown root:root -R remotly
5. Move all files to destination location:
sudo mv remotly /srv
6. Open the configuration file and set desired port number. If possible, we recommend to use the standard HTTPS port (443).
nano /srv/remotly/config/remotly-relay.json
Non-TLS configuration:
{
"tlsEnabled": false,
"key": "",
"cert": "",
"forceTLS": false,
"domain": "",
"port": 443,
"max_bandwidth": 40000000,
"allowed_bandwidth": 30000000,
"password": "PasswordPasswordPasswordPassword"
}
TLS configuration (TLS not mandatory if communication works without it):
{
"tlsEnabled": true,
"key": "provide absolute path to private SSL key in PEM format",
"cert": "provide absolute path to SSL certificate in PEM format",
"forceTLS": false,
"domain": "domain name assigned to relay server IP in DNS",
"port": 443,
"max_bandwidth": 40000000,
"allowed_bandwidth": 30000000,
"password": "PasswordPasswordPasswordPassword"
}
TLS configuration (only TLS encapsulated connections are possible):
{
"tlsEnabled": true,
"key": "provide absolute path to private SSL key in PEM format",
"cert": "provide absolute path to SSL certificate in PEM format",
"forceTLS": true,
"domain": "domain name assigned to relay server IP in DNS",
"port": 443,
"max_bandwidth": 40000000,
"allowed_bandwidth": 30000000,
"password": "PasswordPasswordPasswordPassword"
}
Parameter descriptions:
"tlsEnabled" – Enables or disables additional TLS encryption. Remotly uses end-to-end encryption even if this is disabled. If enabled, valid paths for "cert" and "key" must be provided.
"key" – Path to the private key of the certificate in PEM format. In JSON, escape backslashes (e.g., "/srv/remotly/server_private_key.pem"). Use an online JSON string encoder if unsure.
"cert" – Path to the full-chain certificate in PEM format. Same escaping rules apply.
"forceTLS" - Set to "true" to only allow TLS1.2 or TLS1.3 connections for this relay server. Both client and host must use TLS to communicate (encapsulate AES256 stream into TLS protocol).
"domain" - optional domain assigned to relay's IP address in DNS configuration (highly recommended as this is used for SNI)
"port" – Port number used by remotly-relay for communication.
"password" – To restrict access, provide a password of at least 32 characters. If left blank, the server runs without password protection. If any character is entered, the server will not start unless the password is at least 32 characters long.
7. Execute the installation script:
sudo bash /srv/remotly/script/installremotlyrelay.sh
8. Start the service:
sudo bash /srv/remotly/script/startremotlyrelay.sh
9. Double check if Remotly Relay service is running:
systemctl list-units --type=service --state=running
There should be remotly-relay.service on the list
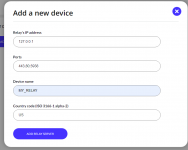
Now that your server is running all we need to do is add your private server's IP and port(s) in your admin panel:


That's it! Now all your Connect Anywhere connections will use your own server.
====================================================================================
TROUBLESHOOTING
====================================================================================
1. After entering https://[relay domain name provided in certificate]:[relay port number]/conectionTest or http://[ip address of your relay]:[relay port number]/connectionTest in browser you see "OK" message but connection through relay ("Force Connect Anywhere" enabled) ends with connection fail.
Likely cause: your server is not accessible from outside your network.
Solution: configure port forwarding on your public IP to the server behind NAT. Test from an external browser to confirm.
2. After entering https://[relay domain name provided in certificate]:[relay port number]/conectionTest or http://[ip address of your relay]:[relay port number]/connectionTest in browser you see "OK" message but connection through relay wtih "Force Connect Anywhere" enabled ends with connection through official remotly relay.
You probably forgot to add your custom relay to your Remotly account using the Remotly web admin panel.
3. Relay server is running but I can't connect to https://[relay domain name provided in certificate]:[relay port number]/conectionTest or http://[ip address of your relay]:[relay port number]/connectionTest from my browser.
If you can't connect to that address from your internal network, check if firewall on server does not block port opened by remotly-relay.
If you can't connect to that address from host outside your internal network but you can from host inside network it means that port forwarding on your network router is misconfigured.
If you have any questions please comment under this post.
In this tutorial we explain how to set up the IP address, port and other settings of you own data transfer server.
It is important not to open your main PC to any potential external attacks. Port forwarding is a nice feature but it is also a security threat. Furthermore if you leave your computer on all the time it consumes much more power than a simple Linux server based on a low-power device like Raspberry Pi or similar device.
Below are some of the main benefits of setting up a private connection server either at home or in your company:
- Lowest possible network lag
- No need to port forward data to any of your PCs that you want to access remotely
- Less power consumption
- Wake-On-Lan accessible from WAN (outside your local network)
- Attacks can only be done on the Linux server. But this does nothing for the attacker as all the data passing the server is encrypted with a key that is not accessible by this server
- Share your server with your friends/co-workers (limit costs)
- No problems with GDPR (passing sensitive data via third party servers)
This guide assumes you have already set up the remote computer (Linux server, Raspberry Pi etc.) you want to make your relay server and have all necessary permissions.
1. First, we need to access the remote machine's Linux system using SSH client. To establish SSH connection, client will ask to provide host IP address and user credentials. There are various tools you can use at this point, e.g. WinSCP, FileZilla or build-in openssh. From now on all the subsequent steps will refer to the server operating system.
2. In order to download Remotly relay you can use WGET utility typing the following command:
For AMD64 architecture please use:
wget https://downloads.mirillis.com/files/remotly-relay-linux-amd64-v2.zip
For ARM64 architecture please use:
wget https://downloads.mirillis.com/files/remotly-relay-linux-arm64-v2.zip
For ARM7 32-bit architecture please use:
wget https://downloads.mirillis.com/files/remotly-relay-linux-arm7-v2.zip
3. After that, unzip the remotly.zip file
unzip remotly-relay.zip
If you don't have unzip installed you probably run into "unzip: command not found" error. In that case you can install it by running the following commands:
sudo apt-get update
sudo apt-get install unzip
4. Grant proper credentials:
sudo chmod 755 -R remotly
sudo chown root:root -R remotly
5. Move all files to destination location:
sudo mv remotly /srv
6. Open the configuration file and set desired port number. If possible, we recommend to use the standard HTTPS port (443).
nano /srv/remotly/config/remotly-relay.json
Non-TLS configuration:
{
"tlsEnabled": false,
"key": "",
"cert": "",
"forceTLS": false,
"domain": "",
"port": 443,
"max_bandwidth": 40000000,
"allowed_bandwidth": 30000000,
"password": "PasswordPasswordPasswordPassword"
}
TLS configuration (TLS not mandatory if communication works without it):
{
"tlsEnabled": true,
"key": "provide absolute path to private SSL key in PEM format",
"cert": "provide absolute path to SSL certificate in PEM format",
"forceTLS": false,
"domain": "domain name assigned to relay server IP in DNS",
"port": 443,
"max_bandwidth": 40000000,
"allowed_bandwidth": 30000000,
"password": "PasswordPasswordPasswordPassword"
}
TLS configuration (only TLS encapsulated connections are possible):
{
"tlsEnabled": true,
"key": "provide absolute path to private SSL key in PEM format",
"cert": "provide absolute path to SSL certificate in PEM format",
"forceTLS": true,
"domain": "domain name assigned to relay server IP in DNS",
"port": 443,
"max_bandwidth": 40000000,
"allowed_bandwidth": 30000000,
"password": "PasswordPasswordPasswordPassword"
}
Parameter descriptions:
"tlsEnabled" – Enables or disables additional TLS encryption. Remotly uses end-to-end encryption even if this is disabled. If enabled, valid paths for "cert" and "key" must be provided.
"key" – Path to the private key of the certificate in PEM format. In JSON, escape backslashes (e.g., "/srv/remotly/server_private_key.pem"). Use an online JSON string encoder if unsure.
"cert" – Path to the full-chain certificate in PEM format. Same escaping rules apply.
"forceTLS" - Set to "true" to only allow TLS1.2 or TLS1.3 connections for this relay server. Both client and host must use TLS to communicate (encapsulate AES256 stream into TLS protocol).
"domain" - optional domain assigned to relay's IP address in DNS configuration (highly recommended as this is used for SNI)
"port" – Port number used by remotly-relay for communication.
"password" – To restrict access, provide a password of at least 32 characters. If left blank, the server runs without password protection. If any character is entered, the server will not start unless the password is at least 32 characters long.
7. Execute the installation script:
sudo bash /srv/remotly/script/installremotlyrelay.sh
8. Start the service:
sudo bash /srv/remotly/script/startremotlyrelay.sh
9. Double check if Remotly Relay service is running:
systemctl list-units --type=service --state=running
There should be remotly-relay.service on the list
Now that your server is running all we need to do is add your private server's IP and port(s) in your admin panel:
That's it! Now all your Connect Anywhere connections will use your own server.
====================================================================================
TROUBLESHOOTING
====================================================================================
1. After entering https://[relay domain name provided in certificate]:[relay port number]/conectionTest or http://[ip address of your relay]:[relay port number]/connectionTest in browser you see "OK" message but connection through relay ("Force Connect Anywhere" enabled) ends with connection fail.
Likely cause: your server is not accessible from outside your network.
Solution: configure port forwarding on your public IP to the server behind NAT. Test from an external browser to confirm.
2. After entering https://[relay domain name provided in certificate]:[relay port number]/conectionTest or http://[ip address of your relay]:[relay port number]/connectionTest in browser you see "OK" message but connection through relay wtih "Force Connect Anywhere" enabled ends with connection through official remotly relay.
You probably forgot to add your custom relay to your Remotly account using the Remotly web admin panel.
3. Relay server is running but I can't connect to https://[relay domain name provided in certificate]:[relay port number]/conectionTest or http://[ip address of your relay]:[relay port number]/connectionTest from my browser.
If you can't connect to that address from your internal network, check if firewall on server does not block port opened by remotly-relay.
If you can't connect to that address from host outside your internal network but you can from host inside network it means that port forwarding on your network router is misconfigured.
If you have any questions please comment under this post.
Attachments
Last edited:
 ORT.
ORT.